How to Get a Business Email for Less Than 10000 Naira in Nigeria

A professional email address such as 'info@yourbusiness.com.ng' makes a stronger first impression than a generic Gmail or Yahoo address. It reinforces your brand every time you send a quotation, invoice, proposal, or customer-support reply. The good news is that a Nigerian small business can often get started for less than N10,000 by paying mainly for an affordable domain name and using Zoho Mail for email hosting.
This guide follows the complete workflow demonstrated in the accompanying video: choose a domain, register it, open its DNS manager, add the domain to Zoho Mail, verify ownership, create users, configure email delivery, and test the finished mailbox.
Would you prefer a step-by-step guide? Watch here!!
What You Will Need
· A registered domain name, such as yourbusiness.com.ng or yourbusiness.ng.
· Access to the registrar account and its DNS management page.
· A working personal email address and phone number for account verification.
· A secure password manager or another safe way to store administrator credentials.
· About 30 to 60 minutes for setup, plus possible DNS propagation time.
What the Cost Covers
The domain name is the paid part of this setup. The exact amount depends on the extension, registrar, promotion, taxes, and renewal price. A .com.ng domain is commonly selected for a low-cost Nigerian setup, while a .ng or .com domain may cost more. Always confirm both the first-year price and the renewal price before checkout.
Zoho currently advertises a free email plan for one custom domain, up to five users, and 5 GB of storage per user in selected data centers. The free plan does not include IMAP, POP, or ActiveSync. If the free option is unavailable for your account or region, you will need a paid Zoho plan or another email-hosting provider.
Step 1: Choose and Search for a Domain
Start with a short domain that matches your business name. It should be easy to say, spell and remember. Avoid unnecessary hyphens, numbers, and unusual abbreviations. If the exact name has already been registered, try a natural variation that still looks professional.
1. Open a Nigerian domain registrar. We will use QServers.ng, but you may use any registrar of your choice.
2. Open the domain search page and enter the business name without spaces.
3. Select the required extension, such as .com.ng, and run the search.
4. If the name is available, continue to registration. If it is unavailable, try a sensible variation rather than a confusing spelling.
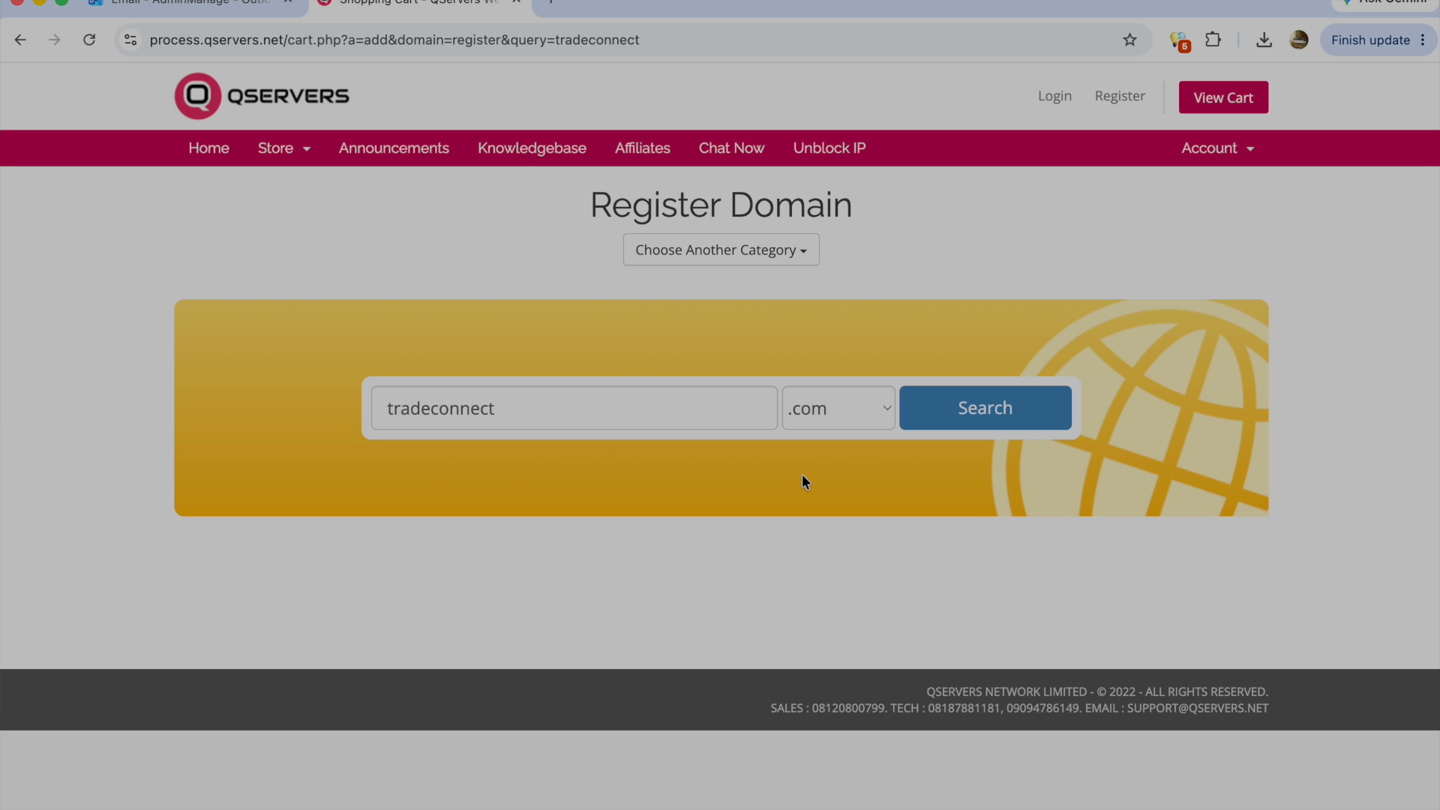
Search for the proposed business name and confirm that the preferred extension is available.
Step 2: Configure and Register the Domain
On the configuration page, review the domain spelling carefully. A typo here will become part of every future email address. Leave the default nameservers unchanged unless you already know that DNS will be managed by another service.
Ensure that DNS management is enabled. You will need it to add the records supplied by Zoho. Then create or sign in to your registrar account, enter accurate contact information and complete payment. Do not expose your payment details, password or one-time authentication code when recording or sharing this process.
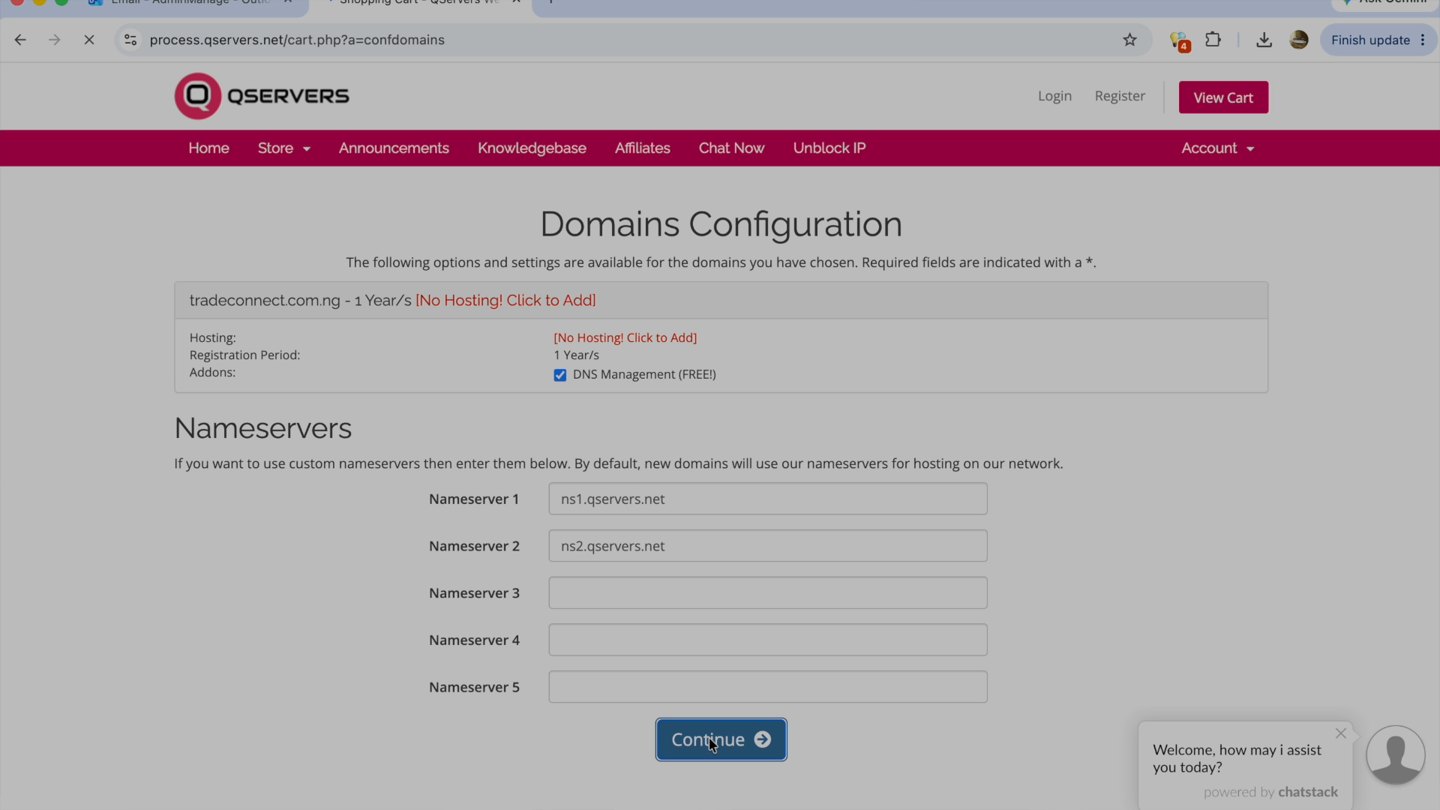
Review the domain configuration and confirm that DNS management is available before checkout.
Step 3: Open the DNS Manager
After the domain becomes active, open the registrar dashboard, select Domains, and locate the new domain. Open its DNS Manager or DNS Zone Editor. This page controls where the domain website and email services are directed.
Existing records may include A records for a website, CNAME records for subdomains and MX records for email. Do not delete website records simply because you are changing email providers. Only add, edit, or remove the records required for the email setup.
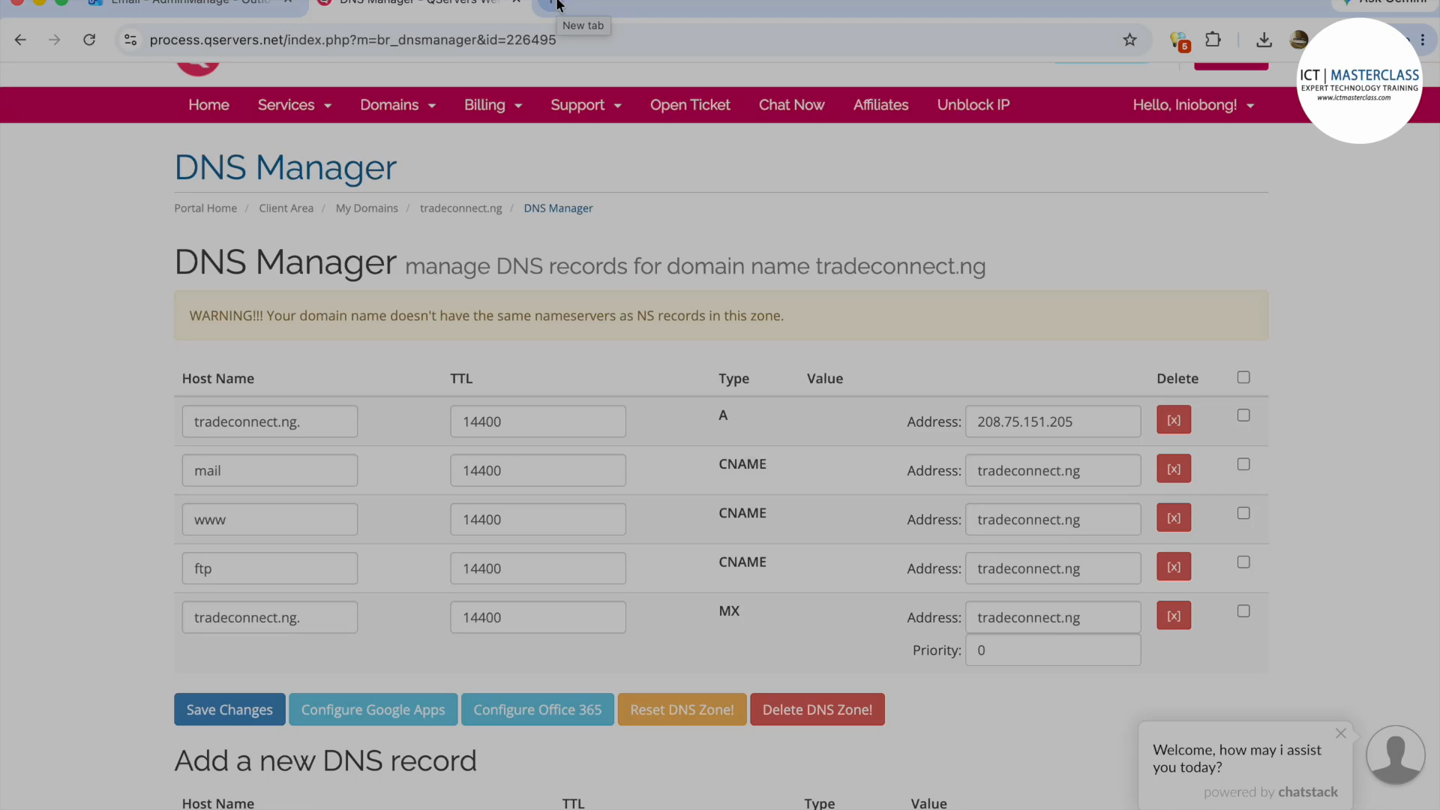
The registrar DNS Manager contains the records that connect the domain to web and email services.
Step 4: Create a Zoho Mail Organisation
5. Visit zoho.com/mail and open the pricing or signup page.
6. Look for the "Forever Free option".
7. Create the account with an active recovery email address and a strong, unique password.
8. Complete email or phone verification privately.
9. Select the option to add a domain you already own.
Enter the domain without www. For example, enter tradeconnect.ng rather than www.tradeconnect.ng. Add the organisation name, choose the correct industry category and continue.
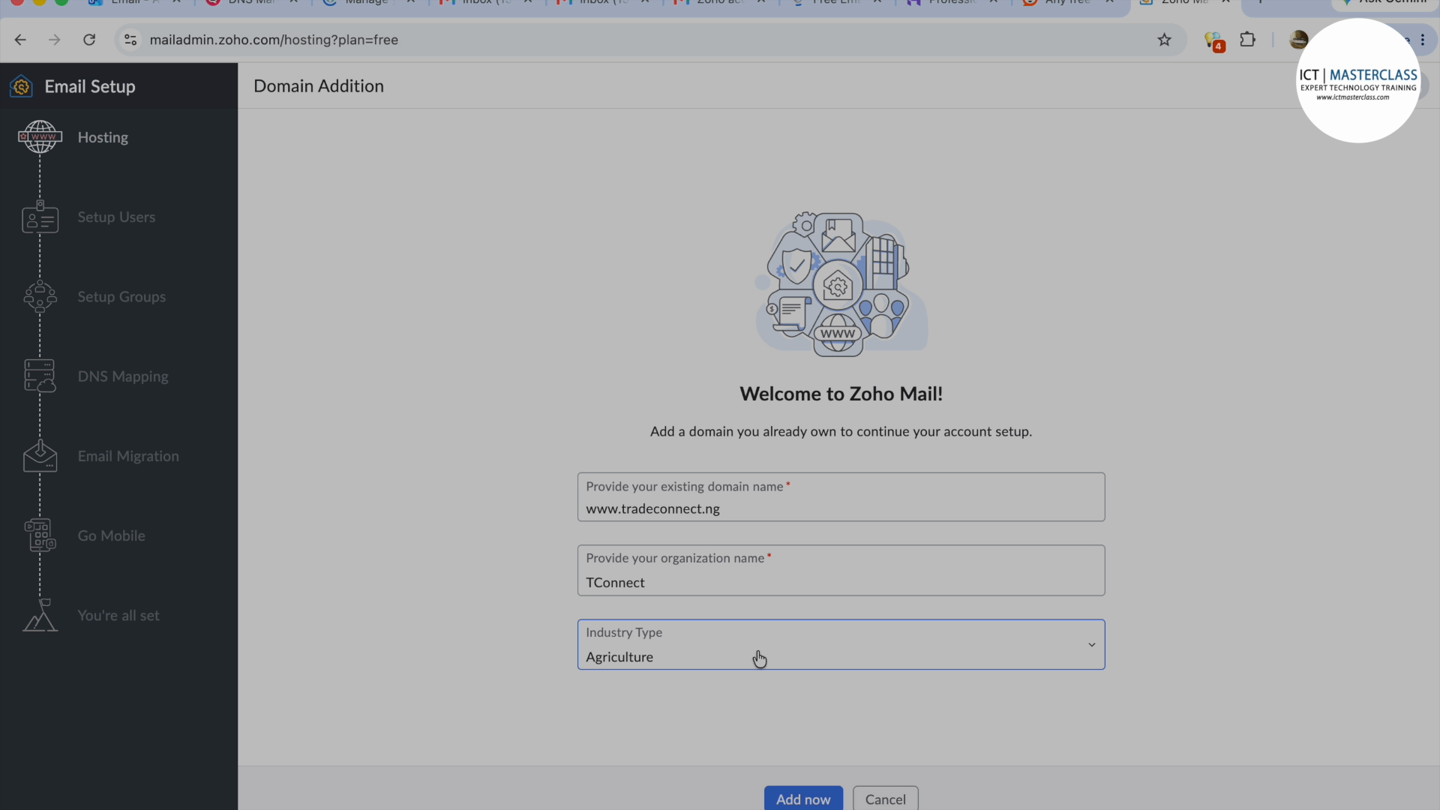
Add the registered domain to Zoho Mail and provide the organization details.
Step 5: Verify That You Own the Domain
Zoho will not activate email for a domain until you prove that you control its DNS. The setup wizard normally offers TXT or CNAME verification. TXT verification is straightforward and is the method demonstrated in the video.
10. Copy the host or name supplied by Zoho.
11. Copy the full verification value. Use the value generated for your own account.
12. Return to the registrar DNS Manager and choose Add a new DNS record.
13. Select TXT as the record type, paste the host and value into the matching fields, and save.
14. Return to Zoho and click Verify TXT Record.
DNS changes are not always visible immediately. If verification fails, check for typing errors or unwanted spaces, wait a few minutes and try again. Depending on the DNS provider and record TTL, full propagation may take longer.
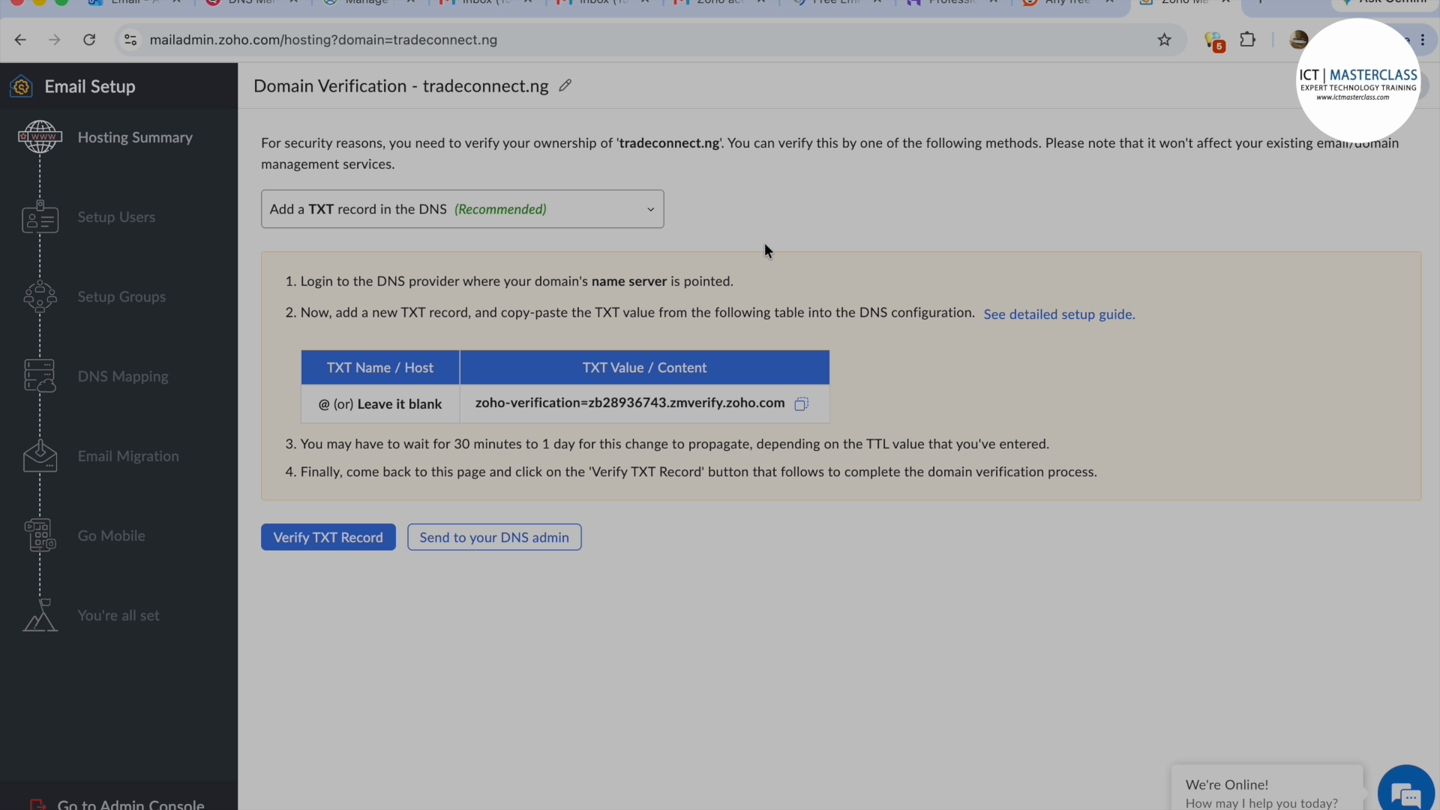
Zoho provides a unique TXT record that you must add to the domain DNS zone to verify ownership.
Step 6: Create the First Mailbox and Other Users
After verification, create the first mailbox. This account normally becomes the organization administrator. Choose a sensible address such as yourname@yourbusiness.com.ng or admin@yourbusiness.com.ng, then create a strong password and enable multi-factor authentication.
You can then create additional user mailboxes. Examples include sales@yourbusiness.com.ng, accounts@yourbusiness.com.ng and support@yourbusiness.com.ng. On the free plan, stay within the current user limit shown in your Zoho account.
Understand User Aliases and Groups
A user has a separate mailbox and login. An alias is another address that delivers to an existing user mailbox. A group distributes messages to several members. If one person handles both sales and support, aliases or groups may reduce the number of separate mailboxes you need, subject to the features available on your plan.
Step 7: Configure MX Records for Incoming Mail
Domain verification proves ownership, but MX records determine where incoming messages are delivered. Open the DNS Mapping or Email Delivery section in Zoho. It will display the correct MX servers and priorities for your Zoho data centre.
15. Copy each MX server and its priority exactly as Zoho displays it.
16. In the registrar DNS Manager, add each MX record. The host is usually @ or the root domain.
17. Remove old MX records only when you have confirmed that they belong to a previous email provider and you no longer need that service.
18. Save the records, return to Zoho and verify the MX configuration.
Do not guess the MX server names from a screenshot. Zoho uses different server domains for different data centres, so the values shown in your own Admin Console are authoritative.
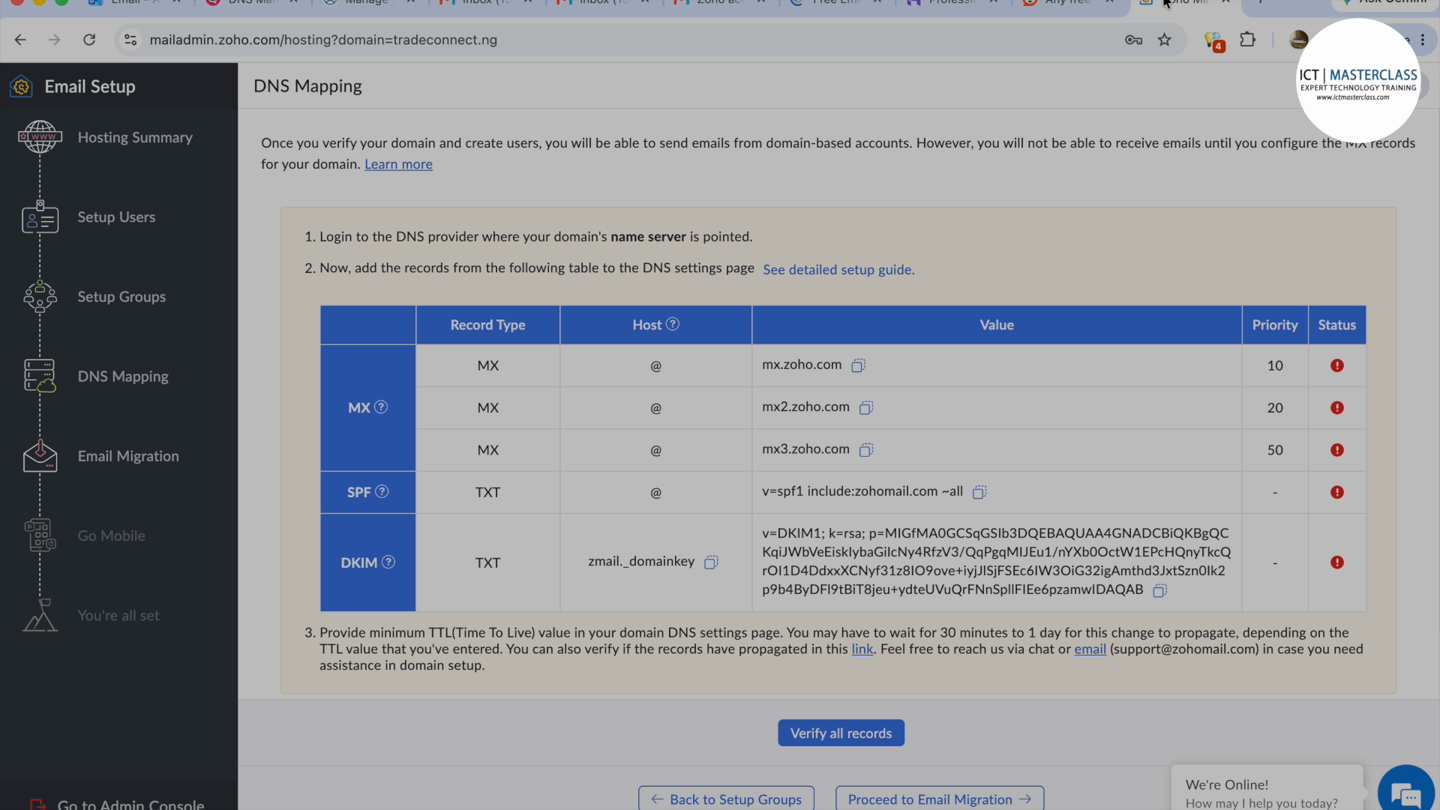
Zoho DNS Mapping lists the MX, SPF and DKIM records required for the account data centre.
Step 8: Add SPF and DKIM
Configure SPF
SPF tells receiving mail systems which servers are authorised to send messages for your domain. Copy the SPF TXT value from Zoho and add it to your DNS zone. A domain should normally have one SPF record. If an SPF record already exists, do not create another one; combine the required authorised services correctly in the existing record.
Configure DKIM
DKIM attaches a cryptographic signature to outgoing mail. In the Zoho Admin Console, create a DKIM selector, copy the generated TXT host and value, add them to DNS, then return to Zoho to verify and enable DKIM. The TXT value can be long, so copy it carefully without adding spaces or omitting characters.
Add DMARC After Testing
DMARC builds on SPF and DKIM by telling receiving servers what to do when authentication fails. Start with a monitoring policy while you confirm that legitimate business systems are aligned. Move to quarantine or reject only after reviewing reports and confirming that all authorised senders are covered.
Step 9: Sign In and Test the Mailbox
19. Go to mail.zoho.com and sign in with the complete business email address.
20. Send a test message to an external Gmail or Outlook address.
21. Confirm that it arrives in the inbox and does not go to spam.
22. Reply from the external account and confirm that the reply reaches Zoho Mail.
23. If delivery fails, recheck the MX records. If messages enter spam, confirm that SPF and DKIM show as verified.
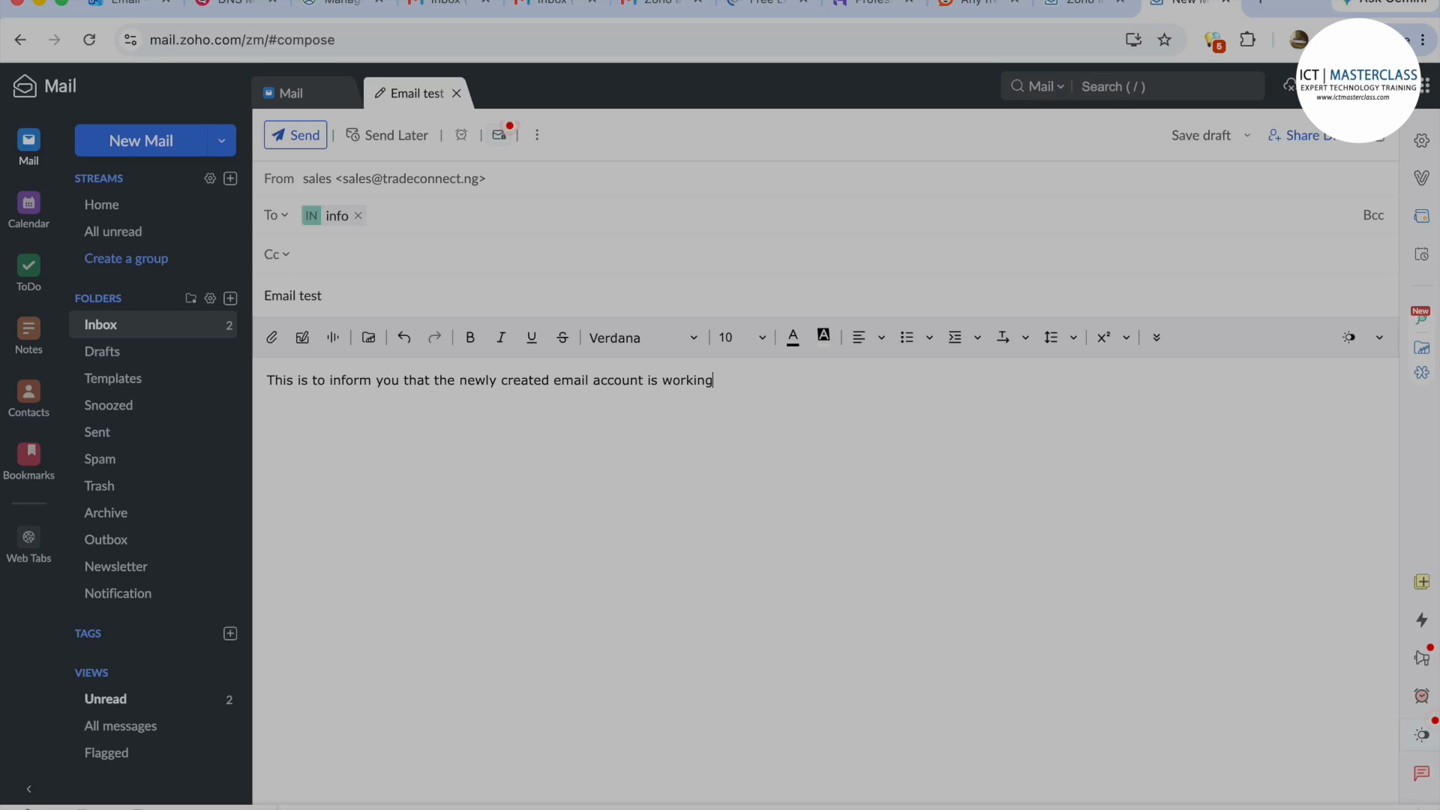
Send a test message from the finished Zoho mailbox and reply from an external account.
Step 10: Add a Professional Signature
A consistent signature makes the finished mailbox more useful. In Zoho Mail settings, create a signature containing the sender name, position, company name, phone number, website and a small logo if needed. Keep it compact and readable on mobile devices. Avoid large images, multiple promotional banners and unnecessary quotations.
Common Problems and How to Fix Them
|
Problem |
What to check |
|
Domain will not verify |
Confirm the TXT or CNAME host and value, remove accidental spaces, and allow time for DNS propagation. |
|
Incoming mail does not arrive |
Check that all Zoho MX records and priorities match your Admin Console and that old provider MX records are no longer active. |
|
Outgoing mail goes to spam |
Verify SPF and DKIM, avoid bulk sending from a new domain, and use clear sender names and legitimate content. |
|
Website stops working |
Restore any website A or CNAME records removed accidentally. Email setup should not require deleting website records. |
|
Free plan is not visible |
The free plan is available only in selected Zoho data centres. Use a paid plan or evaluate another provider if it is unavailable. |
|
Cannot use Outlook or Apple Mail |
The free plan does not include IMAP, POP or ActiveSync. Use Zoho webmail or the supported Zoho mobile app, or upgrade. |
Security Checklist Before You Go Live
· Enable multifactor authentication for the administrator and every user.
· Use unique passwords and store them in a trusted password manager.
· Keep recovery information current and controlled by the business.
· Verify SPF and DKIM before sending important messages.
· Do not publish passwords, one-time codes, verification QR codes or customer information in tutorials.
· Review users regularly and disable accounts that are no longer required.
· Renew the domain before its expiry date so email service is not interrupted.
Final Thoughts
A business email is a small upgrade with an immediate effect on credibility. Once the domain is registered and the DNS records are configured correctly, the same address can be used on quotations, invoices, social profiles, business cards, and customer-support channels.
The complete setup is: register the domain, keep DNS management enabled, add the domain to Zoho, verify ownership, create users, configure MX records, add SPF and DKIM, then test both incoming and outgoing mail. Take screenshots of the final DNS configuration and store the administrator credentials securely for future maintenance.
Important: Zoho's plan features and availability can vary by country or data center. Confirm the current plan details before signing up. The free plan may not include IMAP, POP or ActiveSync access, so some desktop and mobile mail apps may require a paid plan.
Need Help With Your Setup?
If you can't complete the setup or would prefer an expert to handle the domain, DNS, and Zoho configuration, Sentral IT Solutions offers paid business email setup and technical support. Email support@websentral.net to request assistance and receive a quotation.
Publishing Details
|
Suggested title |
How to Get a Business Email for Less Than N10,000 in Nigeria |
|
Suggested URL slug |
business-email-under-10000-naira-nigeria |
|
Meta description |
Learn how to register a domain and set up a professional business email with Zoho Mail in Nigeria for less than N10,000. |
|
Primary keywords |
business email Nigeria, Zoho Mail setup, professional email address, domain email Nigeria |
Useful References
· Zoho Mail pricing: https://www.zoho.com/mail/zohomail-pricing.html
· Add a custom domain: https://www.zoho.com/mail/help/adminconsole/add-domains.html
· Verify domain ownership: https://www.zoho.com/mail/help/adminconsole/domain-verification.html
· Configure email delivery: https://www.zoho.com/mail/help/adminconsole/configure-email-delivery.html
· Configure SPF: https://www.zoho.com/mail/help/adminconsole/spf-configuration.html
· Configure DKIM: https://www.zoho.com/mail/help/adminconsole/dkim-configuration.html
You may also like






Comments
No comment yet